Localization?
The practice of adjusting a product functional properties and characteristics to accommodate the language, cultural , political and legal differences of a foreign market or country.
Localization of iOS Apps?
Making your app available in different languages based on the targeted users.
Apart from the Apps that are downloaded from App Store, there are decent number of iOS Apps that exists on your device by default.
E.g. Phone, Messages, Maps, Calendar, Music, Camera, Stocks, App Store, Game Center, Contacts, Whether, Photos, Notes etc.
The above default apps which are provided by Apple already support localization.
E.g. Settings > General > International > Language
and the select the language you prefer, you can notice all the default apps provided by Apple will reflect the changes according to user preference. This is because all the apps are facilitated with the language and cultural specific content.
These changes might reflect in apps ( downloaded from App Store) also depending on the factor whether they are localized or not.
Approaches
In general there are two ways which are predominantly used to localize the iOS Apps.


Now go to Localizable.strings(English) file and paste the key value pairs for the above UI Elements.
Checkout the below screenshot for reference.


The practice of adjusting a product functional properties and characteristics to accommodate the language, cultural , political and legal differences of a foreign market or country.
Localization of iOS Apps?
Making your app available in different languages based on the targeted users.
Apart from the Apps that are downloaded from App Store, there are decent number of iOS Apps that exists on your device by default.
E.g. Phone, Messages, Maps, Calendar, Music, Camera, Stocks, App Store, Game Center, Contacts, Whether, Photos, Notes etc.
The above default apps which are provided by Apple already support localization.
E.g. Settings > General > International > Language
and the select the language you prefer, you can notice all the default apps provided by Apple will reflect the changes according to user preference. This is because all the apps are facilitated with the language and cultural specific content.
These changes might reflect in apps ( downloaded from App Store) also depending on the factor whether they are localized or not.
Approaches
In general there are two ways which are predominantly used to localize the iOS Apps.
- Default Approach
- Within the App


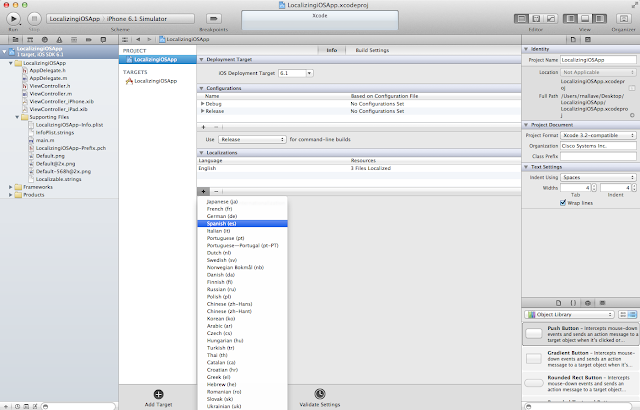
Naming convention "Localizable.strings" is must and should for default approach. Once that is done, next step is add the supported languages.


In the above step, check all and click on finish for time being. In the later part of this post, it will be clear why we need to check this files after adding each language.


Please check mark all the language in the above step, by default only english is checked.
Now look at the magic Xcode does, for every language you added Xcode automatically creates different version of the same file i,e "Localizable.strings" on the left hand side pane of project window as shown below.

Now Let us try to understand how iOS manages to display the appropriate content from those language specific string files.


Xcode creates a separate .lproj directories for each new language you add. if you open those directories you will see the .string files related to specific language. Apart from .string files you can manually copy-paste all the other resources like images, audio files, video files etc into the directories.
Note: You also realize that the files you checked after adding each language are existing in each of this directories....you can check language specific XIB files over there to appear in this directory.

In the run time iOS loads all the resources from respective directories based on the users language preference. Let us see with some simple example which contains Heading Label and Desc Label and see how it works in real time.
Create Heading and Desc Label in ViewController.m as shown below.

Code Snippet for the above Screenshot:
UILabel *headingLabel = [[UILabel alloc] initWithFrame:CGRectMake(10, 70, 300, 30)];
//The below line of code is responsible for retrieving the content from appropriate language specific .string file using NSLocalizedString.
headingLabel.text =[NSString stringWithFormat:NSLocalizedString(@"HeadingLabel", nil)];
headingLabel.textColor = [UIColor blackColor];
headingLabel.textAlignment = NSTextAlignmentCenter;
headingLabel.backgroundColor = [UIColor clearColor];
headingLabel.font = [UIFont fontWithName:@"Arial-BoldMT" size:16.0];
headingLabel.hidden = NO;
headingLabel.highlighted = YES;
headingLabel.lineBreakMode = YES;
headingLabel.numberOfLines = 0;
[self.view addSubview:headingLabel];
UILabel *descLabel = [[UILabel alloc] initWithFrame:CGRectMake(10, 80, 300, 200)];
//The below line of code is responsible for retrieving the content from appropriate language specific .string file using NSLocalizedString.
descLabel.text =[NSString stringWithFormat:NSLocalizedString(@"DescLabel", nil)];
descLabel.textColor = [UIColor blackColor];
descLabel.textAlignment = NSTextAlignmentLeft;
descLabel.backgroundColor = [UIColor clearColor];
descLabel.font = [UIFont fontWithName:@"" size:18.0];
descLabel.hidden = NO;
descLabel.highlighted = YES;
descLabel.lineBreakMode = YES;
descLabel.numberOfLines = 0;
[self.view addSubview:descLabel];
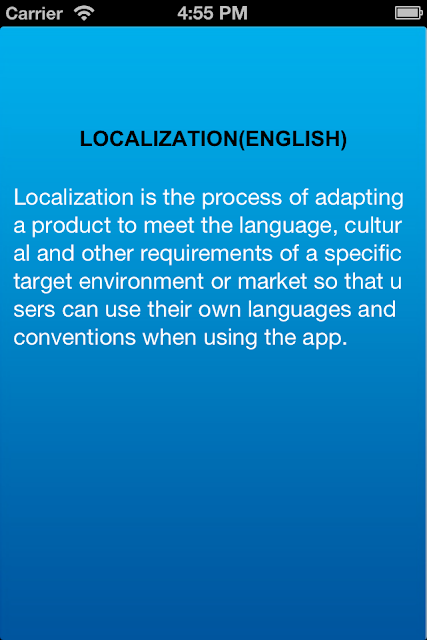
"HeadingLabel" = "LOCALIZATION(ENGLISH)";
"DescLabel"= "Localization is the process of adapting a product to meet the language, cultural and other requirements of a specific target environment or market so that users can use their own languages and conventions when using the app.";
Repeat same thing for Localizable.strings(Spanish).
"HeadingLabel"= "LOCALIZACIÓN (SPANISH)";
"DescLabel"= "La localización es del proceso de adaptar un producto para cumplir los requisitos del lenguaje, culturales y otro de un ambiente o de un mercado específico de la blanco de modo que los utilizadores puedan utilizar sus propios lenguajes y";
Repeat same thing for Localizable.strings(Greek).
"HeadingLabel"= "ΕΝΤΟΠΙΣΜΟΣ(GREEK)";
"DescLabel"= "Ο εντοπισμός είναι πολιτιστικές και άλλες απαιτήσεις της διαδικασίας ένα προϊόν για να συναντήσει τη γλώσσα, ενός συγκεκριμένης περιβάλλοντος ή μιας αγοράς στόχων έτσι ώστε τον οι χρήστες μπορούν να χρησιμοποιήσουν.";
Checkout the below screenshot for reference.

Go ahead and run your project using iPhone (or) iPad Simulator.

How do i switch to Spanish or Greek?
Settings > General > International > Language> Spanish or Greek, then press Done
iOS Simulator will reboot the app with new user settings and we need to relaunch the app again to view the reflected changes.
Note: Do not select the language other than what u included, it shows English by default even if you does so.

Navigate to Screen where your app is and relaunch to view the content in Spanish.

Cons of this Approach
- Users need to leave the app to change the preferences and relaunch it again.
- Language change will be reflected on all other apps that supports Localization.
Pros of this Approach
- Easy to Implement because of Xcode built-in Intelligence
- Not much of Coding is required.
Within the App Approach
Coming..soon!